
This page provides some tips about using the audio/visual equipment in our lecture and tutorial rooms.
General process
Generally, there are three things to do when you walk into a lecture theatre:
- Log into the presenter PC on the desk (It is possible to present from a laptop, but note the ‘Mac users’ section below).
- Switch on the projector(s) by tapping the buttons on the Extron touch screen (or Extron button box, depending on the room).
- Use a microphone (not muted) – there will be a mix of lapel mics, handheld mics, and a foam Catchbox mic in the rooms:
- Make sure the mics you use are: switched on, charged up, and not muted. See Using room microphones.
… and some things to do when you finish your lecture.
- Replace the microphones in the charging cradle (the right way around, and pressed down).
- Pause the lecture recording (firmly press the desk light once, after a couple of seconds it should turn flashing amber to show it’s paused).
- Switch off the projectors if there isn’t a lecture immediately following yours. Tap the ‘Power Off’ button on the Extron touch screen (or Extron button box, depending on the room).
Room Guides
We will attach room guides to the Lecture room guide sheets page.
PC Login times
If you haven’t logged into a particular presenter PC for many months, then your first log in could take fifteen minutes or so while the PC downloads your profile. Therefore please ensure you log into the presenter PC in each room you’ll be using, before your first lectures there. (This process is per each individual presenter PC).
(The ‘pcguest’ account on the presenter PCs logs in quickly, but might not allow you access to the Internet. But it won’t have your M: drive mapped, so best to bring your presentation on a USB stick or download it if using ‘pcguest’)
Mac users
Unfortunately the lecture recording system doesn’t work if a Mac is connected to the presenter desk using the HDMI cable. You can use a Mac with a VGA adapter or connecting via USB-C if possible, but otherwise it would be best to copy your presentation to the room’s presenter PC and use that instead.
Multi-Factor Authentication (MFA)
The presenter PCs in our lecture rooms shouldn’t prompt you with MFA, but if you bring in a laptop you might be prompted.
If you haven’t yet, please make sure you have set up Multi-Factor Authentication, instructions on edin.ac/MFAinfo and ensure you know how to use it. Note that you will be asked to authenticate using MFA whenever you use a Microsoft Office365 service, including MS Teams, or accessing your OneDrive, etc. When you have used MFA to authenticate on a particular PC, then you can tick a box to prevent that PC to prompt you again for 90 days – but that is for that particular computer only. So, if you plan to use an Office365 service during your lectures, make sure to log into that service on the computer(s) you will be using during your lectures.
Checking the lecture recording capture
Some of our rooms (e.g. LT1, LT2, G.01) include small, 7” Lilliput screens which show you a preview of what the lecture recording system is capturing. Aside from ensuring your mic is working, it is a good idea to glance at these screens to check your slides are also being recorded.
Wear a lapel mic – switched on, charged up, not muted
See the Using room microphones page.
Replace mics in charger after use
See the Using room microphones page.
Change monitor mode
The presenter PCs in our lecture theatres and tutorial rooms can be set to different monitor modes:
- ‘Duplicate’ mode. This is a simple mode where all monitors display the same content.
- ‘Extend’ mode. This allows you to split content across the monitors, and lets you use PowerPoint’s ‘Presenter View‘ (see below).
To switch between these modes, press the Windows-P keys on the presenter PC’s keyboard.
If you set to Extend mode, the monitors can be used independently, this means you can display content to the students, and also separate content that only you can see. This mode allows you to use PowerPoint’s ‘Presenter View’ where you can see your presentation notes and the next slide while giving your presentation. When in Extend mode, your mose moves between the different screens when you move the mouse off a side of the screen (it may not be obvious which side of the screen you have to move your mouse off, so try all four if the obvious direction doesn’t work).
Duplicate mode means all the screens show exactly the same thing, so should be less confusing for people. Also, if you plan to use the pens to draw on the SMART Podium, the ‘Duplicate’ mode should reduce potential issues with that.
PowerPoint virtual laser pointer
Physcal laser pointers are not picked up in lecture recordings, and can’t be seen on both projected screens in our rooms with two projectors. So with PowerPoint presentations, it is best to use PowerPoint’s virtual laser pointer.
For further details, see: Using PowerPoint’s virtual Laser Pointer
PowerPoint Presenter View
You can put your PowerPoint into Presenter View to see your slide notes and a preview of your next slide as you talk.
See the room guide sheets for instructions.
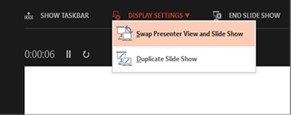
If the PowerPoint ‘Presenter View’ are showing on the wrong screens (with students seeing the Presenter View instead of just the current slide), use the Display Settings menu in the top-left of the Presenter View screen to select Swap Presenter View and Slide Show.
Drawing on SMART Podiums and SMART Boards
Our lecture theatres and tutorial rooms generally contain a SMART Podium or SMART Board, which allow you to use special pens to draw digital SMART Ink on your slides.
SMART Ink can produce confusing effects in ‘Extend’ monitor mode, so it is safest to use ‘Duplicate’ mode (so it can be difficult to use SMART Ink together with PowerPoint’s Presenter View). Also, if using PowerPoint, the pens can switch from SMART Ink to Microsoft Ink, so can take a little getting used to.
Repeat questions from the audience
Ensure the question is picked up by the recording, and can be heard by all in the room (some of our rooms have induction loops for hearing aids).
Check your lecture’s timetabled start time
The lecture recording system (Media Hopper Replay) will start recording your lecture at the start time noted in the timetable. We use the university’s central timetable policy, so only the 9am and 10am lectures start on the hour, the rest of the lectures throughout the day start at 10-minutes past the hour.
Remember your lecture end time
Single lecture slots are 50 minutes long. The lecture recording system allows for a couple of minutes overrun, but then will stop recording (unfortunately the system doesn’t warn it’s about to stop recording). A double lecture might be timetabled as two single lectures, with a gap between them. Please check the clocks in the room to see when you are approaching the end of your lecture.
Pausing during your lecture does not extend the end time
Pausing is a bit of a misnomer in the lecture recording system. If you firmly press the desk light to pause the recording during your lecture (turning it flashing amber) it will not have any effect on the time the recording ends, the recording will still end at the scheduled time. Note that when you firmly press the desk light, it can take a couple of seconds before it turns flashing amber – so wait a little while to check whether it’s paused before trying to press again.
Only ‘*Lectures’ are automatically recorded
Teaching events that appear in the central Timetabler timetable as ‘Lecture’ should be automatically scheduled to record, but events listed as ‘*Tutorial’, etc. (anything other than ‘Lecture’) will not be automatically scheduled to record.
However, if you would like a non-Lecture recorded, and possibly live streamed, then let you Year Admin know and we can manually schedule it to record.
In an emergency you can start an Ad Hoc recording, but best to try that out ahead of time to make sure you have a Learn course you can recording into.
At the end of your lecture, replace mics
When you finish your lecture, make sure to replace the microphones in the charging cradle.
Make sure you replace them the correct way around (they will only push down and light up their charging lights if they are the right way around).
At the end of your lecture, pause lecture recording
Although not strictly necessary, if you can remember to give the desk light a firm press at the end of your lecture (after a second or two it will turn flashing amber), then that will pause the recording and not film people milling around, or an empty desk, until the recording end time.