
You will need
- PC or Mac running the latest version of PowerPoint
- PowerPoint presentation saved as a .pptx file
Download the latest Microsoft Office software (Opens in new tab)
If your slides are saved in the older .ppt format, upgrade the file to .pptx before attempting to record audio.
How to convert an old PowerPoint presentation to .pptx (Opens in new tab)

For the best sound quality, you may want to use an external mic (for instance, a USB headset). Always check that your mic is not muted.
If you’re a staff member creating lecture content, please use the R(D)SVS PowerPoint template for your slides.
We have three short guides for different PowerPoint versions
University managed machines use the ‘Office 2021 LTSC’ version:
This section relates to the updated ‘Office 2021 LTSC’ version of PowerPoint that is supported on University managed machines.
How to add audio to your presentation (365 classic)
How to add audio to your presentation (365 classic)
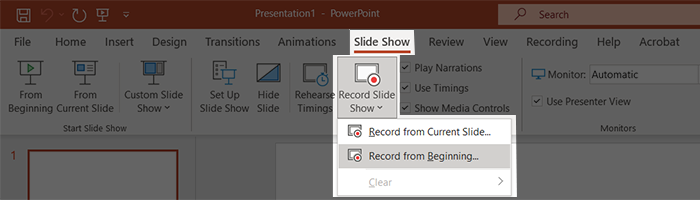
Select the Slide Show ribbon tab.
To record the presentation in one go click the Record Slide Show drop down arrow and select Record From Beginning.
If you need to correct narration on a slide, select Record from Current Slide.
The recording screen will look similar to this:

The top left buttons allow you to stop and start recordings. Show/hide webcam and microphone mute options are in the bottom right of the screen.
If you make a mistake (365 classic)
To re-record a slide, select that slide in PowerPoint. Select Record from Current Slide as shown above. Record the single slide then press Esc when finished.
Note:
- Recording over an existing narration will delete the audio. Make sure you only re-record on the selected slides.
- In this version of PowerPoint, slide transition timings will be automatically updated after re-recording.
Non-managed devices with a 365 subscription use the ‘Office 365 New Experience’:
This section relates to the overhauled user interface experience in PowerPoint. This is the most accurate guide if you are using your Office 365 account on a personal machine.
How to add audio to your presentation (365 new)
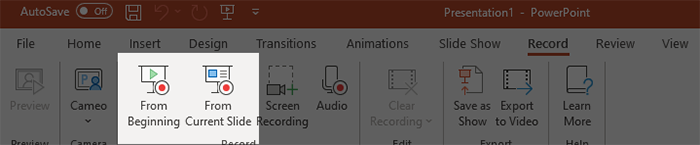
In PowerPoint, select the Record ribbon tab.

To record the presentation in one go select From Beginning.
If you need to correct narration on a selected slide, choose From Current Slide.
Your recording screen will look similar to this:
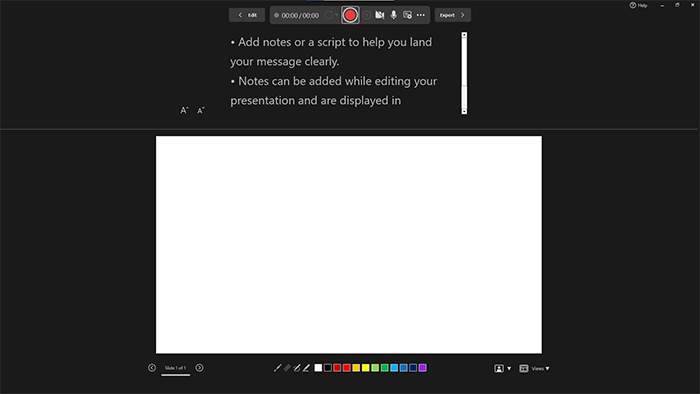
The top bar allows you to stop, start and pause recordings, in addition to show/hide webcam and microphone mute options.

If you make a mistake (365 new)
If a slide already contains narration, you will be blocked from recording until you choose Retake Video to the left of the record button. You can then choose to retake On Current Slide or On All Slides.
Note:
- The retake recording begins immediately after choosing an option, and deletes the current slide audio.
- In this version of PowerPoint, slide transition timings will be automatically updated after re-recording.
Older versions and University managed machines that are not yet updated use ‘PowerPoint 2016’:
PowerPoint 2016
This section relates to older versions of PowerPoint.
How to add audio to your presentation (2016 version)
Note: You can record the presentation in one go by selecting Start Recording from Beginning. If you need to resume recording later slides at a later date, you can select Start Recording from Current Slide.
In PowerPoint, click the Slide Show ribbon tab.

Click the Record Slide Show drop down arrow, select Start Recording from Beginning.

In the window that pops up, leave both boxes ticked and click Start Recording.

You can also use this box to pause narration and then resume narration within a slide.

To stop recording, press Esc.
If you make a mistake (2016)
To re-record a single slide, select that slide in PowerPoint before starting to record the narration. Click the drop down arrow under Record Slide Show to choose Start Recording from Current Slide.

If you want to re-record one slide only, do the recording and stop the slideshow without moving on to the next slide. To stop the slideshow, press the Esc key.
You can record a single slide or a series of slides in this manner.
Note:
- If you start re-recording, every slide you open during the narration will have the existing audio deleted.
- Save a backup before re-recording, and do not move on to a slide which you do not want to re-record or you will scrub the sound.
- When you re-record a single slide, the ‘transition’ timings may not be updated correctly. Please check that the audio duration and slide transition times are similar.
Listening back to what you’ve recorded
Slides with audio attached will show a speaker icon. Hover your mouse pointer over the speaker icon to show the audio player controls. Press play to listen back to your narration.

General advice
Find a quiet space to record
Many audio issues are a result of background noise or interference, so try to record in a quiet room.
Switch off webcam recording
To keep file sizes smaller and more manageable, disable webcam recording when adding audio to a presentation. This also ensures students can see all slide information.
Check the quality of the audio
Listen back to your test recording with the computer’s volume at 50% and check that your voice is audible.
Do a one minute test recording before you continue to record your whole presentation
In some cases, users have reported audio recordings in PowerPoint failing to record audio after 40 seconds. If this happens on a computer at R(D)SVS, contact the Digital Education Unit for assistance.
PowerPoint doesn’t record audio during transitions between slides
Don’t speak while advancing the slide. Also, include a brief buffer of silence at the beginning and the end of each slide to make the transitions smooth and ensure that you don’t cut off audible narration while transitioning from one slide to the next.
Recordings are added to the presentation on a per-slide basis
If you want to change a recording, you only have to re-record the affected slide or slides. Also, you can rearrange the order of slides after recording without having to re-record anything. This also means it’s easy to pause for a break while recording a presentation.
Don’t “link” to media files
If a linked media file is moved or deleted, it will be unavailable in the presentation. You can instead embed videos within PowerPoint. The media is saved within your presentation. You can then trim media to include only relevant sections.
Send us the presentation
A PowerPoint file with audio narration attached can be quite large.
Read our guide to reducing the size of a PowerPoint file
Students
If you’re a student, you will most likely need to submit your file through Learn. Please see the relevant information in the Assessment section of your course.
Submitting assessments within Learn
Staff
If you’re a staff member sending us lecture content, please send us your file via WeTransfer.
WeTransfer Homepage (Opens in new tab)
Please note that WeTransfer is a service external to the University and should not be used for transferring confidential data.
More detailed instructions
You can find more detailed instructions (and video instructions) for recording a PowerPoint with audio on the Microsoft website: